I have had a number of questions about hanging the yardsticks on the wall. Here a link to an earlier blog post where I described the details.
http://notesfromthequiltlab.blogspot.com/2011/05/rulers-and-yardsticks-arent-just-for.html
Monday, July 25, 2011
Sunday, July 24, 2011
Little Quilt Gallery Finished/blue and white block reveal
Remember the vintage yardsticks? How could you forget?! I had hung one yardstick in my narrow hall way with the intention to hang more once I found some. Today I completed the gallery by putting up two more yardsticks. The hallway goes from the front of the house to the kitchen in the back. There used to be a closet right there, but we removed it during some major rennovation to our 1929 home. The hallway is narrow because of this and difficult to get a straight-on photo. It is a good spot because there is no direct sunlight to fade the textiles.
Clips are available here: http://www.ackfeldwire.com/catalog/index.php?cPath=21_112&osCsid=7ae181e7a43e5e72ab18342897ba695c
 The quilts on display are all ones I have made. I can also display antique doll quilts.


Clips are available here: http://www.ackfeldwire.com/catalog/index.php?cPath=21_112&osCsid=7ae181e7a43e5e72ab18342897ba695c


Regarding my last post, here is the blue and white block I have decided to do. Colors will alternate as shown. It is rather large, 3 inches finished :) PA German version is coming next.

I just looked out the window and it is raining. Yay!!!!
Thursday, July 21, 2011
New Project
The really, really, really hot weather reached the east coast today. Ouch. It's a good time to stay inside and quilt so I am starting a new project. Inspired by some recent blogs showing two color quilts, particularly blue and white, I decided I wanted to make one. Temecula Quilt Co. has several two color quilts on their blog. Taryn made a very pretty blue and white Ohio star a while ago. The design I picked will remain a surprise until next time. I picked out some antique fabrics to use, 3 or 4 white shirtings and 2 indigos.


I love blue and white but as I was picking out these fabrics I thought "what would the PA German quilter do if she she wanted to recreate a blue and white quilt she saw?" Certainly it wouldn't be blue and white. I picked out some more fabrics to make a second quilt, same pattern, much different color choice. It should be fun.

Saturday, July 16, 2011

Sunday, July 10, 2011
My little quilt published
"Waste Not" appearing in the Summer 2011 Special Edition of Quilt Mania.


photos from Quilt Mania website
Saturday, July 9, 2011
The Slipcover Diaries, Don't skirt the issues
The last major step for my ottoman slipcover was to add the pleated skirt. Since the shape is already defined, there is no pin fitting needed so I could work right side out. I put the slip cover on the ottoman right side out in order to pin on the piping (that I had made earlier). Having the slipcover on the ottoman allowed me to measure while I pinned so that I could position the piping at the right height all the way around.
![]()
![]() After pinning, I sewed the piping on then trimmed the edge. With piping sewn on, it was much easier to handle when I was ready to add the skirt.
After pinning, I sewed the piping on then trimmed the edge. With piping sewn on, it was much easier to handle when I was ready to add the skirt.
![]() To make the skirt, I cut 8 inch wide strips; I needed three lengths of fabric, sewn together, to give me the length I needed. Because of the pleating, I made the length 2 times longer (plus a little extra) than the perimeter of the ottoman. I hemmed the entire length by turning the raw edge twice, pressed, pinned and sewed.
To make the skirt, I cut 8 inch wide strips; I needed three lengths of fabric, sewn together, to give me the length I needed. Because of the pleating, I made the length 2 times longer (plus a little extra) than the perimeter of the ottoman. I hemmed the entire length by turning the raw edge twice, pressed, pinned and sewed.
I used one of my quilting rulers to help me space out the pleats evenly. After putting in the first pleat, I layed the ruler along the pleat line, then pulled fabric back over the ruler to the 2 inch mark. I pleated the length of the fabric, pinning and then machine basting the pleats in place.
![]()
![]()
Next I pinned the skirt to the top portion of the slipcover and sewed into place sewing right up against the piping. This was much easier than I expected; everthing fit very nicely
![]()
![]() All done!
All done!
![]()
![]()


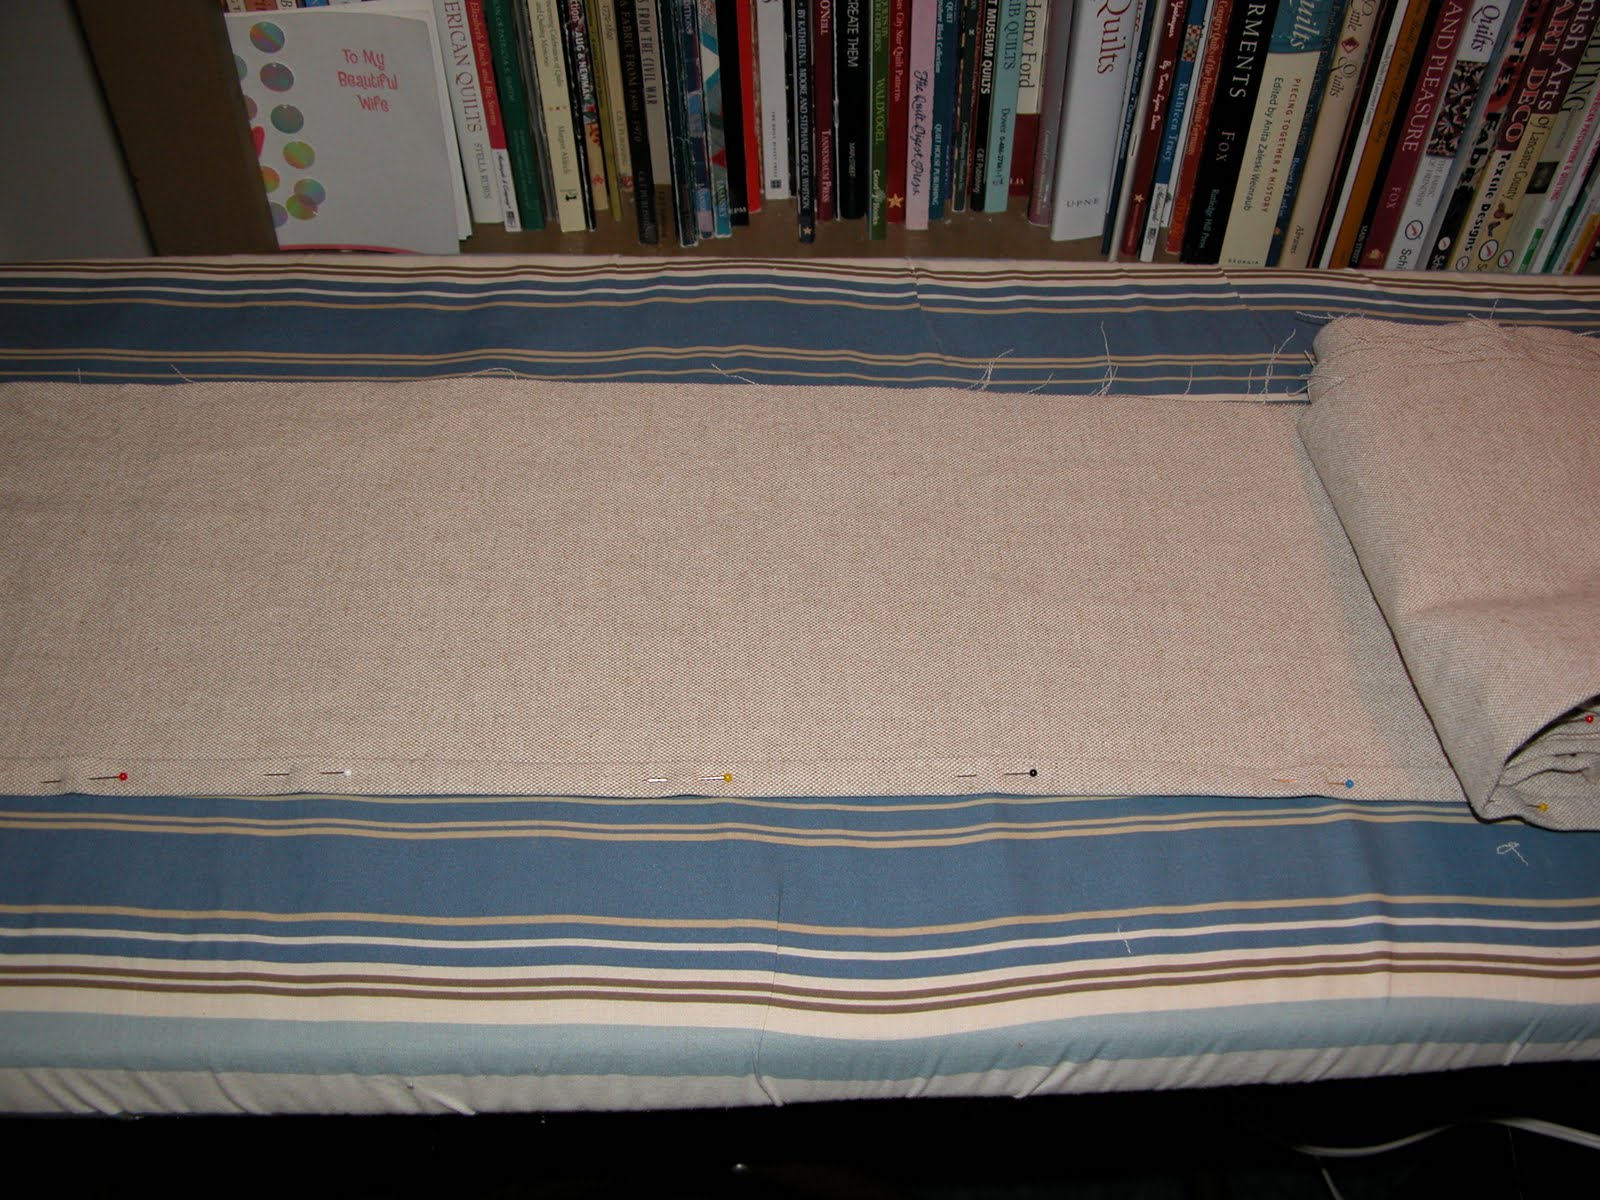
I used one of my quilting rulers to help me space out the pleats evenly. After putting in the first pleat, I layed the ruler along the pleat line, then pulled fabric back over the ruler to the 2 inch mark. I pleated the length of the fabric, pinning and then machine basting the pleats in place.


Next I pinned the skirt to the top portion of the slipcover and sewed into place sewing right up against the piping. This was much easier than I expected; everthing fit very nicely

I left an opeing so I could meet the end of the skirt in the proper place.


Tuesday, July 5, 2011
The Slipcover Diaries, Pipe Down
I used this tutorial for cutting bias strips for the piping for my ottoman slipcover. http://www.patemeadows.com/Cutting-Bias-Strips-for-Piping-and-Banding_ep_61.html
![]() Bias strips, 2 inches wide.
Bias strips, 2 inches wide.
![]() I used Wrights cording, which washed up nicely to preshrink it. The fabric is wrapped around the cording and stitched as closely as possible to the cording using the zipper foot.
I used Wrights cording, which washed up nicely to preshrink it. The fabric is wrapped around the cording and stitched as closely as possible to the cording using the zipper foot.
![]() I made two lengths of piping for the top edge and above the skirt.
I made two lengths of piping for the top edge and above the skirt.
![]() Pin fitting the slip cover:
Pin fitting the slip cover:
I got a lot of helpful information from Miss Mustard Seed's slipcover tutorial on her blog. http://missmustardseed.blogspot.com/ The idea with pin fitting is to cut your pieces to generally fit the chair/ottoman section, then pin the the sections together inside-out to the form of the furniture.
![]()
![]()
![]() The piping gets sandwhiched between the top and side fabrics. The wrong side of all pieces face out.
The piping gets sandwhiched between the top and side fabrics. The wrong side of all pieces face out.
![]()
![]() I worked my way around and got better as I went. I had to go back to the start and re-pin some of it a second time, until I got it right.
I worked my way around and got better as I went. I had to go back to the start and re-pin some of it a second time, until I got it right.
![]() I left the ends of the piping hanging for now, until I sewed most of the way around.
I left the ends of the piping hanging for now, until I sewed most of the way around.
![]() Again using the zipper foot, I sewed along the pin line right up against the piping, pulling the pins out as I went. The corners are tricky and needed a few little tucks here and there. You need to ease the fabric in.
Again using the zipper foot, I sewed along the pin line right up against the piping, pulling the pins out as I went. The corners are tricky and needed a few little tucks here and there. You need to ease the fabric in.![]()
I left the last corner open, then turned the slipover right side out, to figure out the best way to overlap the cording. I pinned that corner and sewed it into place. Here is how it came out. I am going to live with it a couple days and see if I want to try to make any little adjustments. The corners are not exactly the same, but a little adjustment can fix that I think. Next comes the comes a pleated skirt, attached to the bottom with another round of piping inserted. I do best with projects like this if I do a little bit at a time. If I tried to do it all in a day or a weekend, I would get frustrated and it would come out poorly.
![]()
![]()


I got a lot of helpful information from Miss Mustard Seed's slipcover tutorial on her blog. http://missmustardseed.blogspot.com/ The idea with pin fitting is to cut your pieces to generally fit the chair/ottoman section, then pin the the sections together inside-out to the form of the furniture.
Top piece

Side section. An additional skirt section will be added later.


I left the last corner open, then turned the slipover right side out, to figure out the best way to overlap the cording. I pinned that corner and sewed it into place. Here is how it came out. I am going to live with it a couple days and see if I want to try to make any little adjustments. The corners are not exactly the same, but a little adjustment can fix that I think. Next comes the comes a pleated skirt, attached to the bottom with another round of piping inserted. I do best with projects like this if I do a little bit at a time. If I tried to do it all in a day or a weekend, I would get frustrated and it would come out poorly.


Sunday, July 3, 2011
Packwood House Museum Visit
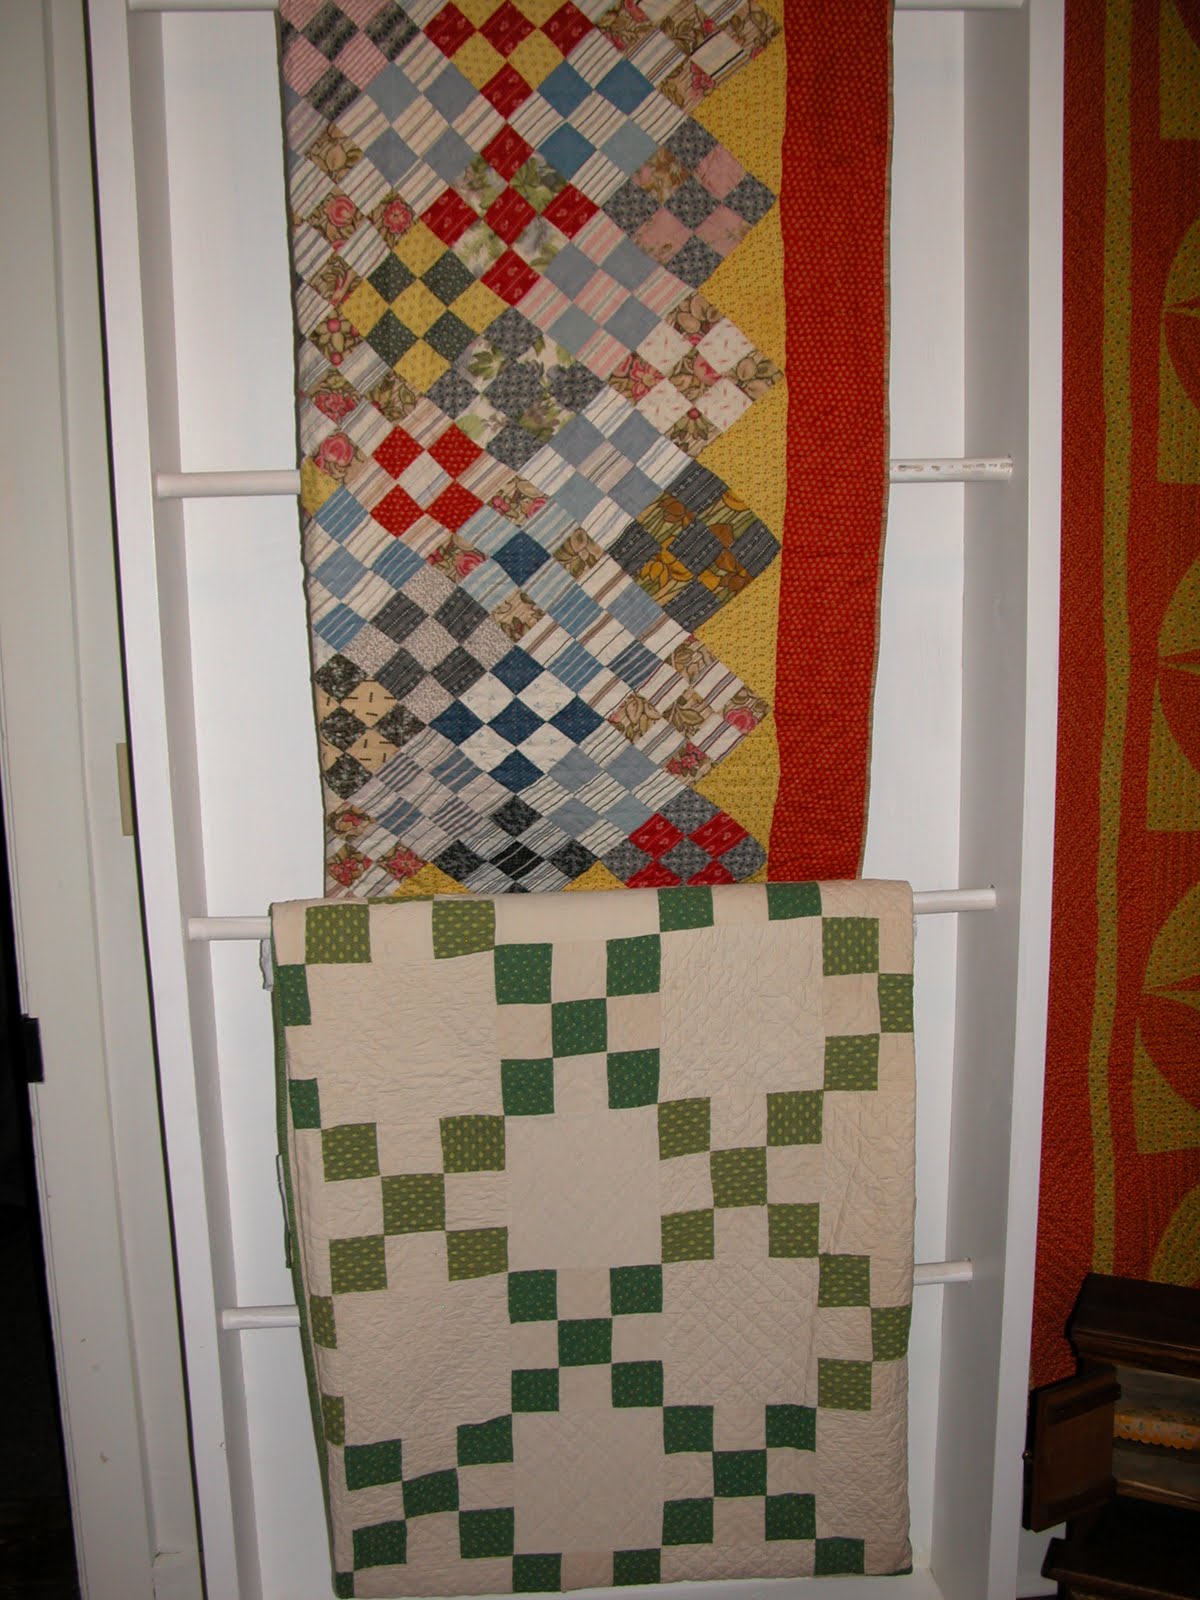
My husband and I took an overnight trip to Lewisburg PA, about a three hour drive from our home. Our first stop, and the reason I picked this destination to begin with, was the Packwood House Museum. They have a large collection of quilts, furniture and art. The story of the family is long and complicated, so you'll have to visit for yourself to find that out, but I wanted to share photos from the museum. The museum director was gracious enough to let me take lots of photos. Good publicity for the museum he says--so please go visit! Here are the quilts on display now. They have many more and are planning a special quilt exhibit for 2012. I will post other photos later.
![]()
![]()
![]()
![]()
![]()
![]()
![]()
![]()
![]()
![]()
![]()
![]()
![]()
![]()
![]()
![]()
![]()
![]()
![]()


Subscribe to:
Posts (Atom)